I know, it is a weird way to start a blog, but I have paid my pizza-face dues, and now- I am so grateful.
Well, I am. And there are many women my age and older who still really struggle, and I seriously get sad for them. Acne is a disease that grates on a person's self-esteem like no other. I will never forget my first visit to the dermatologist. My mother handed me my diagnosis paper, and it read:
"Acne Vulgaris"
I suffered under it's grip from the onset of puberty until right after marriage. When my face would momentarily clear up, it would start creeping down my back and my arms. When it appeared right after I finished breast-feeding Langston, I ran to the doctor as fast as I could for medication. I am not on medication for it now, and I am so grateful for God's healing and grace.
And you know, as I re-read this, it is my hope that people don't take acne as seriously as I do. I was severely made fun of for it, and it was an everyday battle over the cover-up question:
Do I put makeup on? Do I not? I am not fooling anyone. Is the makeup making it worse? AAAARGH!
Do I flip out over the sight of a spot? No. I have learned the best way to fight the big baddies is to simply ignore them. I have a lot of experience in acne-fighting, and the meanies grow if you give them too much attention (I could start a sermon here, but I am not thinking that deeply this morning, sorry).
Like gremlins in water. Acne is...
I started all of this zit-talk as we took about 30 pics of my big ol' face yesterday for a makeup tutorial, and in looking at them, I am so glad for the work God did on my skin. He loves me so much.
Anyway- BIG SHOW, BIG EYES...
I have a few go-to eye makeup configurations, and this tutorial focuses on how to make one's eyes look wide and sultry.
These are the products we are using today, among others...

1. MAC Prep and Prime. Primer is (seriously, seriously, seriously) the most fundamental key in applying makeup well, which is what most of you don't want to hear (as the average Jane doesn't own it). After moisturizing clean skin, smooth a pump of primer (Smashbox's is my favorite) over your dry face, and then apply makeup as usual. Your makeup will glide more smoothly and evenly, and last so much longer. You need primer.
2. Lancome Bi Facil. This is a eye makeup remover that year after year ranks above the rest. But really, any remover will work. Do not opt for oil-free. The oil is what will easily and gently removes mascara, and we do not want to rub our eyes too much. Before you start on any eye makeup, be sure your previous day's makeup is off.
3. Eye shadow. I use MAC, but use whatever you have. If your makeup is less expensive, it probably has a fair amount of talc in it, which causes it to fly around and fall onto your cheek or below your eyes. Place a tissue under your eye to catch the stray shadow while you apply.
4. Brushes. Please use a brush and not that foam wand that comes with some shadows. Trust me.
5. MAC blush in Melba. I have used this peachy blush on girls with alabaster skin, as well as olive skin tones. It brings life to a dull face.
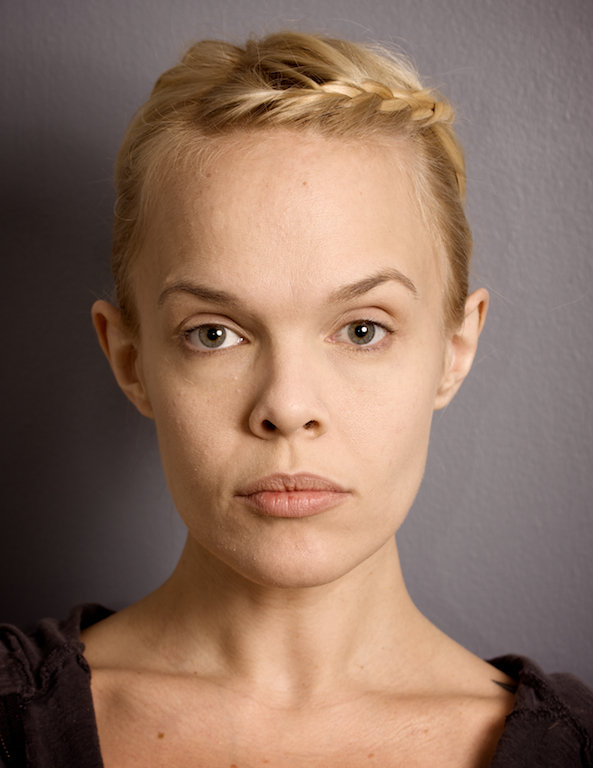
So, prepare your canvas. Clean your face, moisturize (if needed), and prime. And then look happier than this...


Unfortunately, there is a bit of a shadow on the right side of my face in these pictures, so try to focus on my left eye.
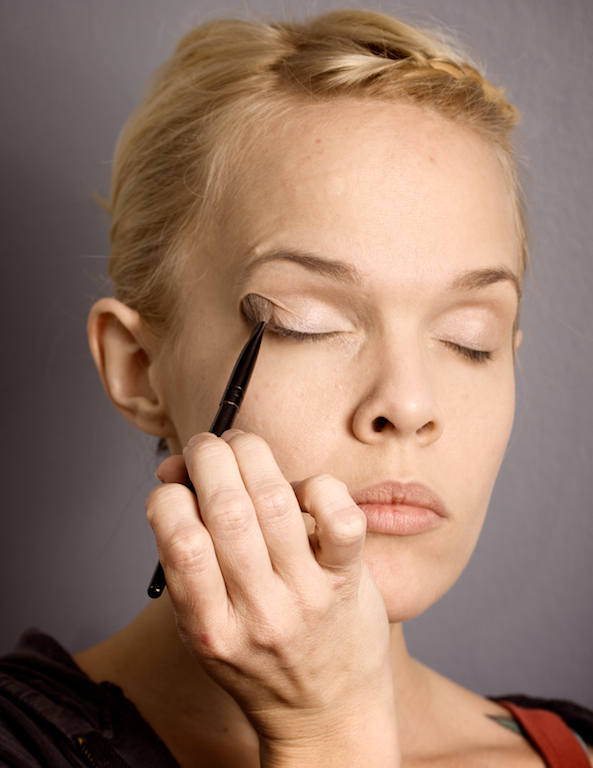
Now, dab some concealer all over your eyelid and under, gently. Lids are normally dark and veiny. I also put concealer both on and to the sides of my nostrils, and then went ahead and put on some foundation. I use a powder foundation from MAC, called "Studio Fix." I love it.

I tried to explain to my husband last week: makeup is about taking color away from the places you don't want it, and putting it back on the places you do. I think he rolled his eyes.
Now, using a shadow that is a shade or two lighter than your skin color, apply from the inward corner of your eye to about the halfway point of your lid.


I use one with a bit of pearlescent shimmer, but if you have more mature skin, use a matte color. You do not want the lustre to reflect the natural texture of your lids. Texture is desirable for hair, not eye lids.
And for those of you climbing into the tanning bed this season...
Anyway....
Next, grab a shade that is about two shades darker than your skin tone. Place the palm of your hand under your chin to steady it, and work the color in a back-and-forth motion across the crease of your lid.


For day, you can stop here. Add some mascara, blush, and gloss, and you are done. But we aren't.
Using the same color, start at the outer corner of your eye, and brush it across your lash line, just to the half way point (where we left off with the pale color.)


Now, over the color you have just laid, take a deeper brown (or you could be working in the black and greys), and follow the same shape. Here's what I look like after:


Take your dark shade (the one you were just using), and starting at the outward corner of your eye, smooth a light amount underneath your eye, until just past the halfway point. I use my finger to gently pull my eye taut while I apply.

Now, remember that first, light color we used? Pull it out, and in a dabbing motion, dab some in the corner of your eye...

And the continue up and just under where your dark shadow is. Think: high points.

Brightening up the inward corner of your eyes will really open them up. Now, you can put some of the same color just below your brow, where that naked spot is...


I would say you could finish here, but I am not. I am a big fan of the sculpted brow, and the inward, wider parts of my brows could use some filling. So I will.
Take an angled or flat brush, and apply a shade that is one to two tones deeper than your skin color (not too dark), using an angled, upward motion (in the direction your brows grow). Fill in the negative space, and even extend if you want, but not too far. Here's what I did...

For some added drama, you can (using your angled brush and your deepest color), dab on some extra color right at your lash line, where your eye liner would go. Just focus on the outer corners of your eyes.
Add some mascara, and your eyes should be big and beautiful!

Remember to focus on my left eye.
Now, as your eyes are so bold, take it easy on the rest of your face. First, look closely: is there anything you need to clean up? Take a big powder blush and quickly swish it off your face...

Oh, I look so sad! Hmm...
Blush is a necessity.
Smile, and starting right at the apple of your cheek, swirl the brush around that space, and then back on your cheekbone, nearly to your hairline.

Wow. Take your focus off the chompers for two seconds and see where I started. You always want to leave some brightness around your t-zone. It gives the illusion that you are glowing.
Now, sweep back.

Now, put on some gloss, or a very nude lipstick, and call it a day. Or night.

Big Show, big eyes! Cannot wait to see you all there!
Rachel Bee
LOVE IT! the smiley picture made me chuckle.. :)
ReplyDeleteYou are so awesome!! This is amazing! I love Mac products and look amazing on you!!
ReplyDeleteyes. the smiley one is hilarious. all so serious and then...BANG!
ReplyDeletethanks melanie!